Installing Insulation: Peugeot Expert Campervan Conversion
- slaters089
- Jun 28
- 3 min read

Updated: Jul 1

Welcome to the fifth instalment of our camper conversion series! In this post, we'll be insulating the walls of our 2020 Peugeot Expert. You'll find a step-by-step guide along with helpful tips and tricks for your own conversion project.
A full walkthrough video is included at the bottom of the page.
Tools Used:

Why did I pick these items?
10mm Thermoacoustic Insulation
I initially ordered 10mm-thick insulation so it would fit between the grooves in the van's floor, beneath the plywood flooring. I continued using the same roll for other sections throughout the van. Although thinner options like 7mm or 5mm were available, the slightly thicker insulation will also help to reduce road noise and isn't much more expensive.
Evo Fleece
Evo fleece is made from recycled plastic bottles, making it both sustainable and cost-effective. It's non-irritant, so it's safe to handle, and it doesn’t absorb moisture, which lowers the risk of mould growth.
Thin Reflectix Insulation
This was a gift from a family member, and I wasn't initially sure where to use it. When I realised that using the thicker 10mm insulation between the walls and plywood lining would reduce the available space, I decided that a single layer of Reflectix would be a good compromise, even though its R-value is relatively low.
Step One: Installing the 10mm Insulation
I started by installing the thermoacoustic insulation on the inside of the doors, as well as in the recessed sections of the van's walls. This continued from the wheel arches we began working on in part one of the series, when we were sound deadening the van.
Cutting and sticking the insulation wasn't difficult, but it was time-consuming. If you have larger arms, you might find it tricky to reach into the smaller or deeper sections of the van's doors.
Step Two: Reflectix
Before fully covering the upper sections of the walls with thermoacoustic insulation, I first applied thin reflective insulation to the outer areas. This helped to maximise the coverage while also allowing room for the EVO fleece, which will have the greatest impact on temperature regulation.
For the install, I sprayed both the walls and the Reflectix with adhesive spray, waited a minute for the adhesive to go tacky, and then secured them together.
Tip: It's important to keep the doors open for ventilation while using the spray.
Step Three: Finishing 10mm Insulation
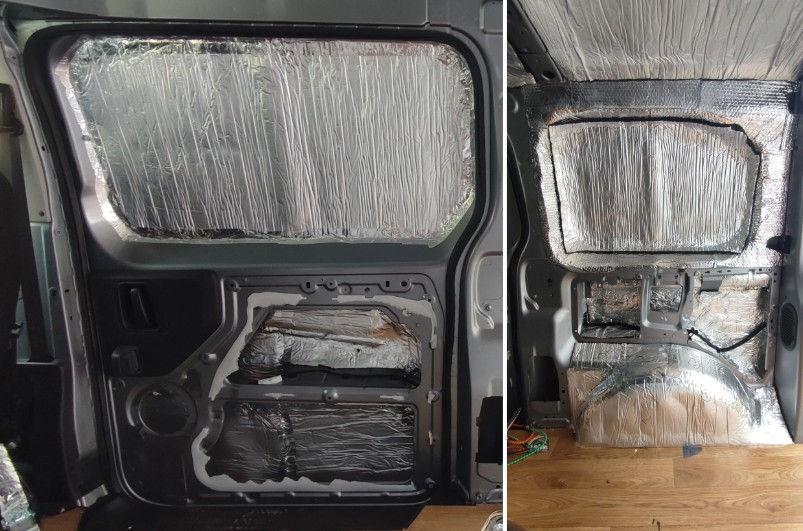
After installing the Reflectix, I finished installing the 10mm thermoacoustic insulation on top of it in the recessed sections of the van's walls.
Next, I covered the seams with aluminium tape to create a fully reflective surface. The tape will also help to smooth out the insulation on the upper sections of the doors, which will be carpet lined later on. I'll be covering this soon in a future update.
Step Four: Wire Prep
Before we could install the thermofleece, I had to prepare the wires for the roof lights.
I cut a length of wire matching the AWG of the LED hub I'll be using for the roof lights and ran it through the walls of the van.
Tip: I cut a coat hanger so it could be used as a hook; this made retrieving the wire from inside the van's walls much easier.
Although I used some standard wire I had on hand, cables specifically designed for vehicles would be better—they're thicker to prevent damage from vibrations. To avoid unwanted tension, I left plenty of slack so the wire wouldn't be pulled tight. I also wrapped the sections of wire that would be in contact with the metal edges inside the van's walls with protective tape.
Step Five: Installing EVO Fleece
We filled the cavities in the walls and doors with the EVO fleece. I used the coat hanger again to push the fleece into place, as well as to pull it through the small cavities at the top of the van's walls.
After stuffing small pieces of the fleece into the deeper sections of the doors and walls, I found folding the fleece saved time when filling the larger spaces. Where necessary, I applied a small amount of adhesive spray to help secure the wool.
Tip: You don't need to pack the fleece tightly. The air gaps within its structure are essential for optimal performance.
What's Next?
In the next instalment of our campervan conversion series, we’ll be carpet-lining the exposed metal inside the van. After that, we will be reinstalling the ply lining – this time either painted or varnished.
For more van content, visit my YouTube channel here.


Comments